| The Board Panel |
This is where the main simulation takes place. It has three principal elements. The control panel at the top, the results panel at the left hand side, and the board itself.
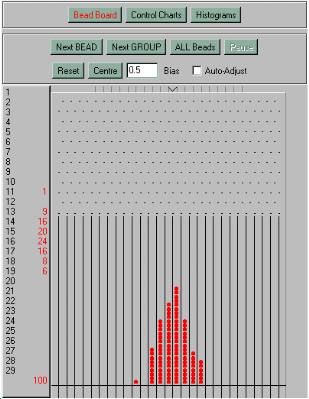
By default, the board is set up to run a simulation of 100 beads. The total number of beads is actually made up of a number of subgroups of a particular size. This is so that control charts can be plotted for the data. In order to change the number of beads which are run in a single simulation, you must change either the number of groups, or the subgroup size.
The current subgroup size, the number of groups and the total number of beads are displayed at the top of the Exercise Panel. They are shown there rather than on this panel for two reasons. Primarily, the amount of space available on this panel is a considerable limiting factor. Secondly, by placing them on the exercise panel, they are visible no matter which view is currently being used on the simulation panel.
When the simulation is running, the number of beads in each of the collectors is displayed in the results panel. The total number of beads which have been collected so far is also displayed at the foot of the reults panel.
If you are running a large number of beads, the collectors will very soon become full, because there is only a limited amount of screen space which can be used for them. However, the column totals on the results panel will still be updated correctly.
The controls for the board are as follows:
Next Bead
If there are more beads left, this button releases the next bead into
the board.
Next Group
If there are more beads left, this button releases the next group of
beads. The current group size is displayed on the
Exercise Panel. If the number of beads released so far is not a
multiple of the group size, then it is assumed that we are in the
middle of a group, and the remaining beads in that group will be released.
For example, if the group size is 5, and 22 beads have been released so far,
pressing the Next Group button will release the next three beads to
complete the current group. Since the number of beads released is now 25,
pressing the button again will release the next complete group.
All Beads
If there are any more beads left, this button releases the remaining
beads. If all the beads have been run, pressing this button will reset
the board and release the total number of beads. (See note
about resetting the board.)
When this button is pressed, it disables the three release buttons, and enables the pause button. At any point during the simulation you may press pause to stop the beads.
Pause
If the button to release all the beads has been pressed, this
button will pause the simulation. You may reactivate the board from
the point you stopped it by pressing one of the three release buttons.
Reset
This clears the board and sets the column totals back to zero.
Note: Resetting the board invalidates all data collected so far. This means that the control charts and the histograms will also be cleared.
Centre
By default, beads are released into the pin panel from a point
halfway across the top edge of the board. The release point is marked by a
'V' shape. Clicking and dragging this V will change the point from which
the balls are released. Clicking the 'Centre' button will return the
release point to its original location.
Bias
The bias of the board controls the probability that a bead will fall
to one side or the other of any of the pins. By default, the bias is 0.5,
which means that there is a fifty percent chance that a bead will fall
to either side of any one of the pins.
Increasing the bias has the same effect as tilting a physical board slightly to the left; it increases the probability that a bead will fall to the left of any given pin. The larger the bias (up to a maximum value of 1.0), the more likely it is that the bead will fall to the left.
Reducing the bias to a value below 0.5 has the opposite effect. It increases the probability that a bead will fall to the right of a pin.
The minimum bias is 0.0 and the maximum is 1.0. Any number between these two is valid. If an invalid number is entered, the bias will be restored to its last value, and an error message wil be displayed.
Caution: Changing the bias will reset the board with the new value. This means that if you change the bias halfway through a set of beads, you will lose all data gathered so far and will have to start the simulation again from the beginning. (See note about resetting the board).
Auto-Adjust
Auto-adjust is designed to simulate the effects of 'tampering' or
'hunting', whereby an operator makes frequent minor adjustments based on
the measurements for single items. In this model, the target value is
taken as the column directly below the release point when the simulation
is started. The effect of tampering is created by using the value of the
last bead in each group to adjust the release point.
Caution: Turning auto-adjust on or off will reset the board
with the new setting. This means that if you change the setting halfway
through a set of beads, you will lose all data gathered so far and will
have to start the simulation again from the beginning. (See
note about resetting the board).
| UP: |