Attempt 1 - The Results
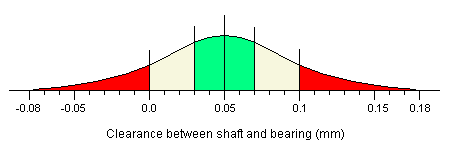
After several levels of assembly and re-assembly, we finally have 1000 finished units. However, about 136 of them will be too loose to function properly. This is not the end of the story, either. You will recall that the ideal gap was in the range 0.03mm to 0.07mm, shown in green on the figure below.  By calculating the area under the curve between 0.03mm and 0.07mm, we find that roughly 36% of the assemblies can be expected to fall within this range. We can, therefore, calculate the number of assemblies which will be classified as ideal, and add this information to our table.
So, in the final reckoning, we have gone through the process of assembling a shaft and bearing together 1136 times, to get 1000 assemblies, of which only about 864 are suitable, and only about 409 are ideal. Surely we could do better than this. |